Exercises to Help You Dance Through a Growth Spurt
If your sense of gravity and balance seem “off” during dance class—and all your pants are suddenly too short—there’s a good chance you’re going through a growth spurt. It can be frustrating, especially as a dance student, for your own body to feel unfamiliar. But growth spurts also present opportunities to strengthen your changing muscles, prevent injuries in the long term, and move more mindfully. We asked Kristen Kurie, PT, DPT, of NYC’s Westside Dance Physical Therapy, to share exercises that’ll help you dance through it all.
All photography by Quinn Wharton. Hair and makeup by Angela Huff for Mark Edward Inc. Modeled by Haley Connington.
Exercise 1: Foot Loading
During a growth spurt, your long bones grow faster than your tendons and muscles, which leaves your body more susceptible to injuries such as tendinitis. This exercise focuses on calf muscle control for speed work, like jumping, and landing with a neutral ankle to prevent ankle sprains.

Photo by Quinn Wharton
{“adCodes”: [], “adsOrder”: [3]}
{“product_info”: {“caption”: “Buy Now”, “product_price”: 0, “product_vendor”: false, “linkout_url”: false, “product_compare_at_price”: 0}, “headline”: “”, “credit”: “u003cpu003ePhoto by Quinn Whartonu003c/pu003e”, “description”: “u003cpu003eu003cstrongu003ePart 1u003c/strongu003eu003c/pu003eu003cpu003e1. Stand with your feet slightly apart in parallel.u003c/pu003e”, “caption”: “”}

{“product_info”: {“caption”: “Buy Now”, “product_price”: 0, “product_vendor”: false, “linkout_url”: false, “product_compare_at_price”: 0}, “headline”: “”, “credit”: “u003cpu003ePhoto by Quinn Whartonu003c/pu003e”, “description”: “u003cpu003eu003cstrongu003e u003c/strongu003e2. Lunge forward on your right foot with your knee tracking over your big toe.u003c/pu003e”, “caption”: “”}

{“product_info”: {“caption”: “Buy Now”, “product_price”: 0, “product_vendor”: false, “linkout_url”: false, “product_compare_at_price”: 0}, “headline”: “”, “credit”: “u003cpu003ePhoto by Quinn Whartonu003c/pu003e”, “description”: “u003cpu003e3. Push back off the right foot, raising it to du00e9gagu00e9 devant. Hold the balance for a few seconds.u003cbru003eu003c/pu003e”, “caption”: “”}

{“product_info”: {“caption”: “Buy Now”, “product_price”: 0, “product_vendor”: false, “linkout_url”: false, “product_compare_at_price”: 0}, “headline”: “”, “credit”: “u003cpu003ePhoto by Quinn Whartonu003c/pu003e”, “description”: “u003cpu003e4. Repeat step 2 and step 3 five times on each side.u003c/pu003e”, “caption”: “”}

Photo by Quinn Wharton
{“adCodes”: [], “adsOrder”: [3]}
{“product_info”: {“caption”: “Buy Now”, “product_price”: 0, “product_vendor”: false, “linkout_url”: false, “product_compare_at_price”: 0}, “headline”: “”, “credit”: “u003cpu003ePhoto by Quinn Whartonu003c/pu003e”, “description”: “u003cpu003eu003cstrongu003ePart 2u003c/strongu003eu003c/pu003eu003cpu003e1. Start with your feet slightly apart in parallel, and again lunge forward on the right foot.u003c/pu003e”, “caption”: “”}

{“product_info”: {“caption”: “Buy Now”, “product_price”: 0, “product_vendor”: false, “linkout_url”: false, “product_compare_at_price”: 0}, “headline”: “”, “credit”: “u003cpu003ePhoto by Quinn Whartonu003c/pu003e”, “description”: “u003cpu003e2. Rather than shifting back to du00e9gagu00e9, keep your body weight forward in the lunge position. Quickly push your front foot just off the floor, until it’s fully pointed, and quickly return to the lunge with control through the foot and ankle, keeping the knee aligned over the big toe.u003c/pu003e”, “caption”: “”}

{“product_info”: {“caption”: “Buy Now”, “product_price”: 0, “product_vendor”: false, “linkout_url”: false, “product_compare_at_price”: 0}, “headline”: “”, “credit”: “u003cpu003ePhoto by Quinn Whartonu003c/pu003e”, “description”: “u003cpu003e3. Repeat the push-off five times. Try to place your front foot in the same spot each time, while keeping your back up and engaging your lower abdominal muscles. Repeat on the other side.u003cbru003eu003c/pu003e”, “caption”: “”}
Exercise 2: Standing Straight-Spine Squats
The upper leg is particularly susceptible to injury during growth spurts because of increased muscle tension in the hamstrings and quads, and those muscles’ connections to the always-vulnerable hips and knees. This exercise counteracts that stress by stabilizing muscles of the upper leg.

Photo by Quinn Wharton
{“adCodes”: [], “adsOrder”: [3]}
{“product_info”: {“caption”: “Buy Now”, “product_price”: 0, “product_vendor”: false, “linkout_url”: false, “product_compare_at_price”: 0}, “headline”: “”, “credit”: “u003cpu003ePhoto by Quinn Whartonu003c/pu003e”, “description”: “u003cpu003e1. Stand with your feet slightly apart in parallel. Lift the right foot behind you in parallel coupu00e9.u003c/pu003e”, “caption”: “”}

{“product_info”: {“caption”: “Buy Now”, “product_price”: 0, “product_vendor”: false, “linkout_url”: false, “product_compare_at_price”: 0}, “headline”: “”, “credit”: “u003cpu003ePhoto by Quinn Whartonu003c/pu003e”, “description”: “u003cpu003e2. Slowly bend your supporting knee, ensuring that your knee stays in line with the big toe of your supporting foot, and that it doesn’t roll inwards as you bend the knee further. Maintain an upright spine and tight abdominal muscles.u003c/pu003e”, “caption”: “”}

{“product_info”: {“caption”: “Buy Now”, “product_price”: 0, “product_vendor”: false, “linkout_url”: false, “product_compare_at_price”: 0}, “headline”: “”, “credit”: “u003cpu003ePhoto by Quinn Whartonu003c/pu003e”, “description”: “u003cpu003e3. Straighten the knee on your balance. Repeat five times without losing your alignment.u003c/pu003e”, “caption”: “”}

{“product_info”: {“caption”: “Buy Now”, “product_price”: 0, “product_vendor”: false, “linkout_url”: false, “product_compare_at_price”: 0}, “headline”: “”, “credit”: “u003cpu003ePhoto by Quinn Whartonu003c/pu003e”, “description”: “u003cpu003e4. After the last repetition, bend your knee again, but this time bring your raised foot to parallel arabesque, aligning the back of your head with the tips of the toes on your right foot, while engaging your abdominal and glute muscles.u003c/pu003e”, “caption”: “”}

{“product_info”: {“caption”: “Buy Now”, “product_price”: 0, “product_vendor”: false, “linkout_url”: false, “product_compare_at_price”: 0}, “headline”: “”, “credit”: “u003cpu003ePhoto by Quinn Whartonu003c/pu003e”, “description”: “u003cpu003e5. Pull back upright to coupu00e9. Repeat the entire sequence on the opposite side.u003c/pu003e”, “caption”: “”}
Exercise 3: Lumbar Stability in Arabesque
While your spine is growing, it’s especially important to have strong back muscles to control and stabilize your upper body. These exercises focus on the muscles surrounding the lower back or lumbar spine, which are also critical in arabesque.

Photo by Quinn Wharton
{“adCodes”: [], “adsOrder”: [3]}
{“product_info”: {“caption”: “Buy Now”, “product_price”: 0, “product_vendor”: false, “linkout_url”: false, “product_compare_at_price”: 0}, “headline”: “”, “credit”: “u003cpu003ePhoto by Quinn Whartonu003c/pu003e”, “description”: “u003cpu003eu003cstrongu003eu003c/strongu003eu003cstrongu003ePart 1u003c/strongu003eu003c/pu003eu003cpu003e1. Lie on your stomach with your hands under your forehead and your legs extended. Make sure your spine is in a neutral position and your abdominal muscles are engaged.u003c/pu003e”, “caption”: “”}

{“product_info”: {“caption”: “Buy Now”, “product_price”: 0, “product_vendor”: false, “linkout_url”: false, “product_compare_at_price”: 0}, “headline”: “”, “credit”: “u003cpu003ePhoto by Quinn Whartonu003c/pu003e”, “description”: “u003cpu003eu003cstrongu003eu003c/strongu003e2. Keeping both thighs connected to the floor, slowly bend your right leg at the knee, bringing it up as far as it can go without arching your low back .u003c/pu003e”, “caption”: “”}

{“product_info”: {“caption”: “Buy Now”, “product_price”: 0, “product_vendor”: false, “linkout_url”: false, “product_compare_at_price”: 0}, “headline”: “”, “credit”: “u003cpu003ePhoto by Quinn Whartonu003c/pu003e”, “description”: “u003cpu003e3. Lower the leg back to the floor. Repeat five times on each side, alternating sides.u003c/pu003e”, “caption”: “”}

{“product_info”: {“caption”: “Buy Now”, “product_price”: 0, “product_vendor”: false, “linkout_url”: false, “product_compare_at_price”: 0}, “headline”: “”, “credit”: “u003cpu003ePhoto by Quinn Whartonu003c/pu003e”, “description”: “u003cpu003eTip: Once the exercise begins to feel too easy, try bending both legs simultaneously without arching into your low back, rather than alternating legs.u003cbru003eu003cstrongu003eu003c/strongu003eu003c/pu003e”, “caption”: “”}

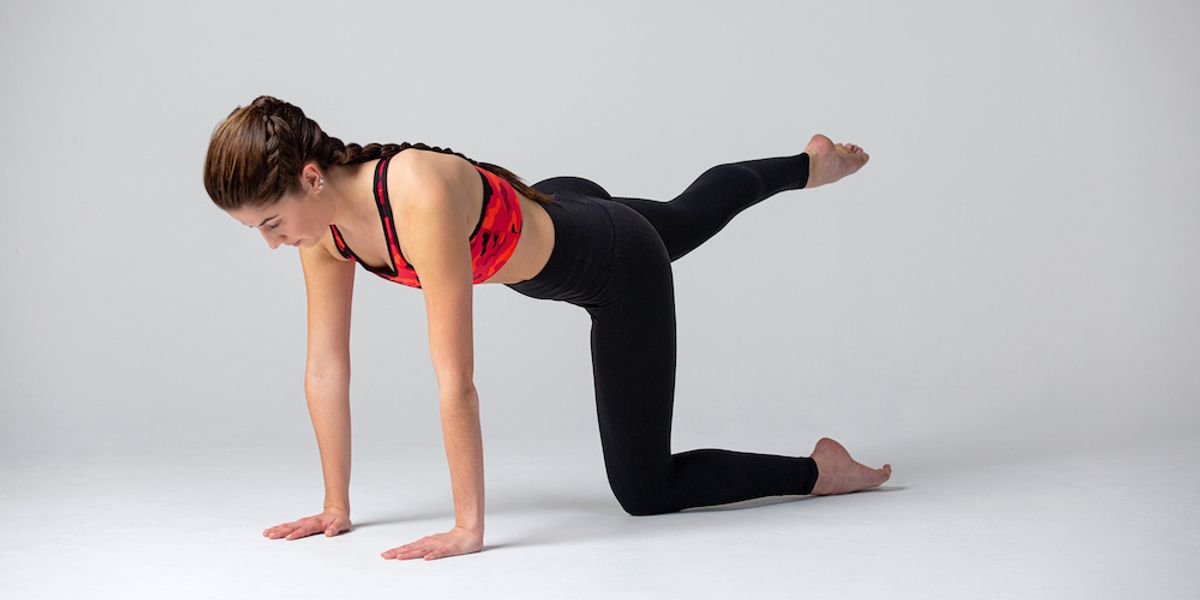
Photo by Quinn Wharton
{“adCodes”: [], “adsOrder”: [3]}
{“product_info”: {“caption”: “Buy Now”, “product_price”: 0, “product_vendor”: false, “linkout_url”: false, “product_compare_at_price”: 0}, “headline”: “”, “credit”: “u003cpu003ePhoto by Quinn Whartonu003c/pu003e”, “description”: “u003cpu003eu003cstrongu003ePart 2u003c/strongu003eu003c/pu003eu003cpu003e1. Start in a tabletop “crawling” position. Make sure your hips are aligned with your knees, and that you’re not sinking into your shoulders.u003c/pu003e”, “caption”: “”}

{“product_info”: {“caption”: “Buy Now”, “product_price”: 0, “product_vendor”: false, “linkout_url”: false, “product_compare_at_price”: 0}, “headline”: “”, “credit”: “u003cpu003ePhoto by Quinn Whartonu003c/pu003e”, “description”: “u003cpu003e2. Raise your right foot behind you into parallel arabesque, without changing the alignment of your lower back. Hollow out your abdominal muscles if your lower back starts to arch.u003c/pu003e”, “caption”: “”}

{“product_info”: {“caption”: “Buy Now”, “product_price”: 0, “product_vendor”: false, “linkout_url”: false, “product_compare_at_price”: 0}, “headline”: “”, “credit”: “u003cpu003ePhoto by Quinn Whartonu003c/pu003e”, “description”: “u003cpu003e3. Return to the starting position. Repeat five times on each side, alternating sides.u003cbru003eu003c/pu003e”, “caption”: “”}